Changelog
Follow up on the latest improvements and updates.
RSS
new
improved
Didit Checklists
Migrate All Checklists at Once to Didit from Herocoders' paid apps
We’ve upgraded our migration capabilities to support instant, global migration of all checklists from Checklists for Jira (Pro and Enterprise) apps to Didit.
Global Migration Steps
- Navigate to the Didit section in Jira admin settings and click "Import."
- Choose to either replaceexisting Didit checklistsor addto them across all issues.
- Specify stakeholders to be notified via emailupon successful migration.
- Instantly view the number of successfully migrated issues on the same page.
All checklists in your Jira instance will be migrated in one go, retaining their statuses and content. For more details, refer to the migration documentation or contact support.
 You can alternatively migrate checklists to Didit in inidividual Jira issues by following our documentation.
 Benefits of switching to Didit:
One of the key reasons customers migrate from Herocoders' Pro and Enterprise versions to Didit is our strong focus on audit and compliance.
Didit is built with advanced documentation, verification, and tracking capabilities
, making it an ideal choice for teams that require detailed audit trails. Read more.new
Didit Checklists
Color-Coded Task Statuses in Checklists
Set-up visual, color-coded task statuses for checklist tasks so all stakeholders can interpret the status of tasks uniformly. To do so, open ‘Task Status’ in Didit’s admin settings. Enable the ‘Show task status in all tasks’ toggle.

There are three default statuses - ‘Open’, ‘Complete’, ‘Skipped’. Admins can create additional custom statuses and assign one of six predefined colors. Here are some examples:

new
improved
Didit Checklists
Improved Checklist Template Permissions: Grant Access to Individuals
Admins can now restrict checklist template access by individual users in addition to the existing group-based permission model.
- Choose the template you want to restrict and enter the edit mode.
- At the permissions settings section in the right sidebar - select “edit”.
- Select one or multiple users to restrict access.
With this update, individuals from different groups can collaborate on the same template, eliminating the complexity of creating a new group in Atlassian User Management.

⚠️Before you set-up restrictions, ensure the 'All templates and checklists will be accessible by default’ toggle is disabled in the Admin settings. Once disabled, templates and checklists will no longer be accessible to everyone except for those who have been granted permission to view them.

For more information, read our documentation on global checklist default permission settings. If you have questions, schedule a call for support.
new
Didit Checklists
Instantly migrate all checklists from Checklists for Jira (Free) to Didit
We’ve upgraded our migration capabilities to support instant, global migration of all checklists from Checklists for Jira (Free) app to Didit.
Migration Made Easy:
Step 1: Initiate the migration from the Jira admin apps section for Didit by clicking on ‘Import’.
Step 2: Choose whether to replace existing Didit checklists or to simply add the migrated ones.
Step 3 (Optional): Specify stakeholders to notify via email upon successful migration.

Your migrated checklists will retain their original statuses and content, ensuring a smooth transition without any data loss. For more details, refer to the migration documentation or contact support.
Benefits of switching to Didit:
- No limits on checklists, items, or templates with Didit.
- Access advanced checklist features like QR code labels and signatures.
new
Didit Checklists
See who completed a task—no need to sift through audit logs
When multiple team members are working on the same checklist, our new
‘Show details’
option reveals who checked off a task. This is handy for quick auditing.- Navigate to the checklist of your choice either in the Jira issue view, a Confluence macro, or in the Didit hub.
- Click the three-dot menu and select ‘Show details’.
This will display:
- Who completed or skipped each task
- Precise timestamps for each action

new
Didit Checklists
Unlock Unlimited Checklists with Didit: New Checklist Import Capability
Didit simplifies the migration process from Checklists for Jira (Free) by HeroCoders with an easy 3-step solution. Migrate all your existing checklists in a Jira issue to Didit in one go, and gain access to unlimited checklist items, tasks, and templates.
Migration Steps:
- First, ensure the "Save local checklist items to Jira custom fields" toggle is enabled under the Global Settings for “Checklist for Jira | Free” for the migration to proceed.
- Click "Import Checklists" in the Didit checklist section of a Jira issue to open the migration import dialog box.
- A 'successful migration message'will confirm the transfer is complete.

Benefits of migrating to Didit:
- No limitson checklists, items, or templates with Didit.
- Leverage advanced checklist capabilities including printable checklist QR code labels, signatures and more.
Enjoy a smooth, quick migration with minimal setup or disruption. For more details, refer to the migration documentation or contact support.
new
Didit Checklists
Multiple Checklists - Add more than one checklist to a Jira issue
Break down complex tasks into manageable steps, improve collaboration across functions, and track progress efficiently with multiple checklists. Either add them ad-hoc or from template directly into a Jira issue. Read more.

The audit log records task updates and completions across all the checklists of an associated issue.
With this release, here's how you can also:
- Automatically add multiple checkliststo an issue using Jira Automation.
- Modify your Jira workflowsto validate all checklists within an issue.
Note:
If you have enabled the Didit tasks completed percentage
, the value would be aggregated across all checklists in an issue. new
Didit Checklists
New Automation Wizard: Simplify checklist automation rule setup in Jira
The wizard generates the necessary JSON configuration for your Jira automation, allowing you to copy and paste it directly into your rule—
no coding required
. Launch the Automation Wizard directly from any template on the Didit Hub. 
Set-up Jira automations to:
- Create a Checklist from Template
- Replace Metadata for a Checklist
You can also define an execution rule to control how the Automation Wizard behaves when a checklist already exists within an issue.
For detailed instructions, read our documentation.
ICYMI: Automatically create a checklist with Didit when an issue transitions to a new status or when a custom field value changes. Explore the wide range of Jira automations compatible with Didit.
new
Didit Checklists
Undelete / restore a checklist template
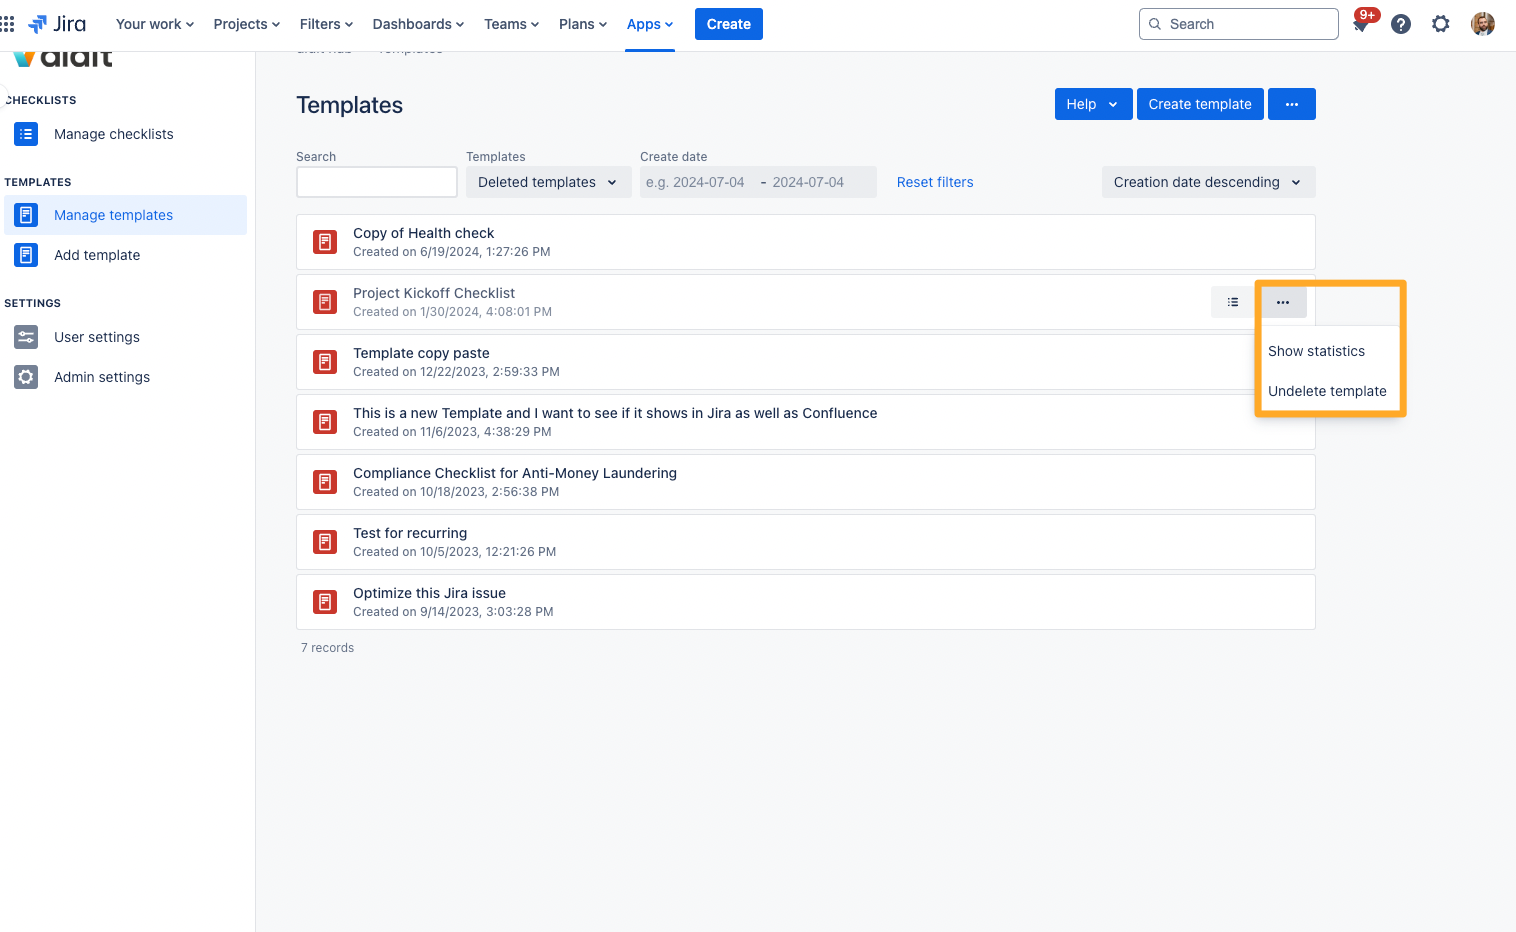
You can now restore deleted checklist templates in Didit Hub. Simply navigate to "Manage templates," filter for "Deleted templates," and use the options menu to undelete the desired template.

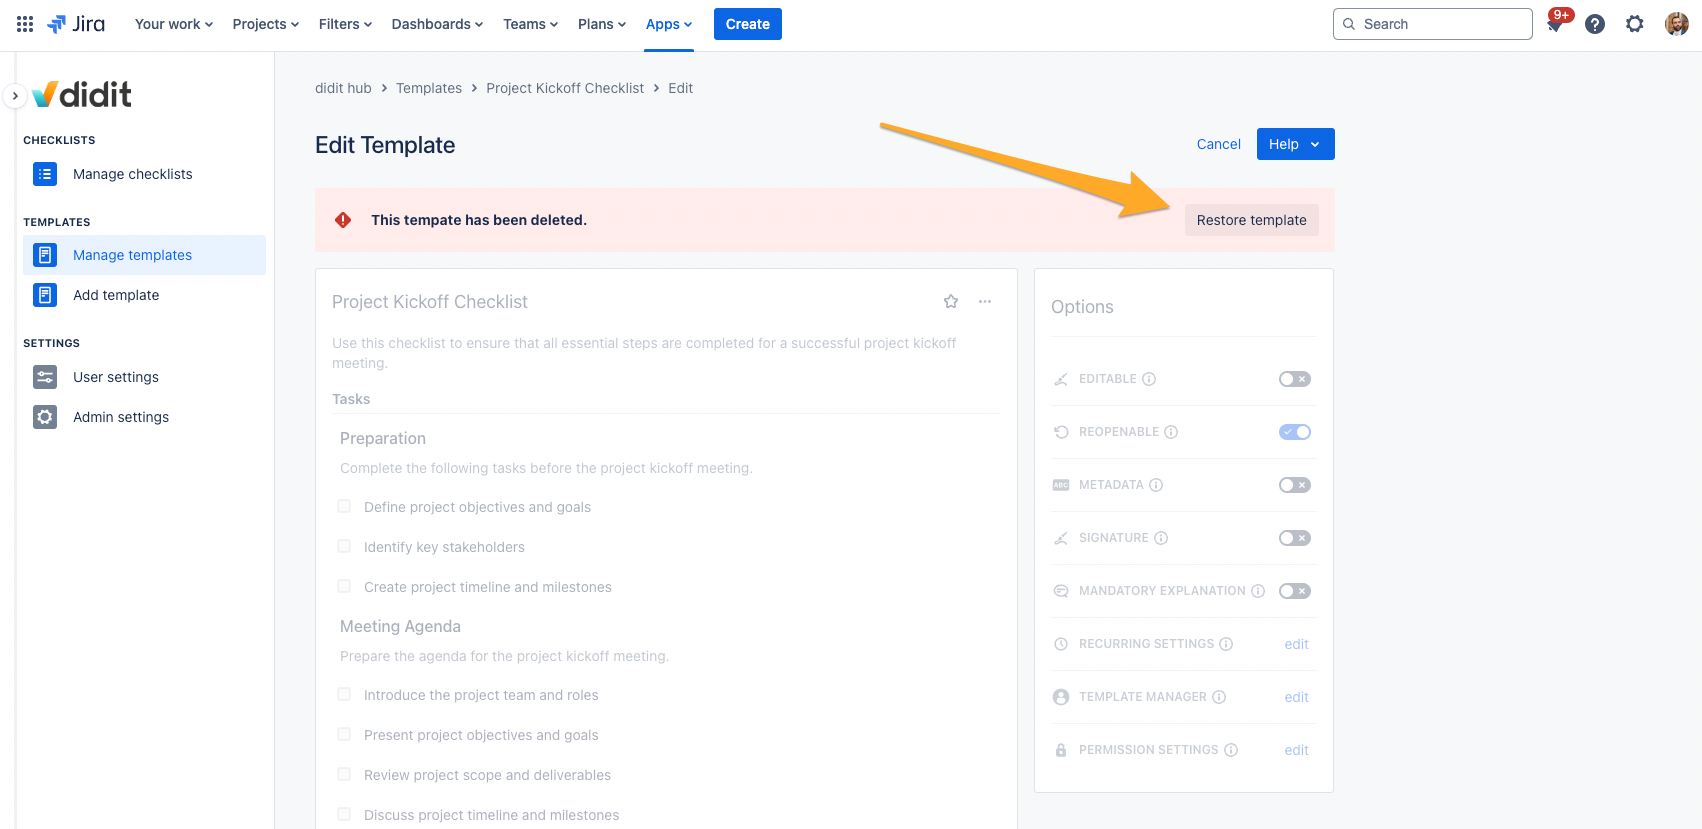
Additionally, templates can be restored directly from their detail view. The restored template will appear in the list of active templates with its original creation date.

For detailed instructions, visit the How to Restore a Checklist Template page.
fixed
Didit Checklists
No More Notifications for Didit Custom Field Changes
To improve user experience, we have disabled email notifications for changes to Didit custom fields, such as completion percentage. These fields often change frequently, leading to unnecessary emails for Jira issue subscribers. This update addresses a common customer request, ensuring that notifications are more meaningful and relevant.
This change should help reduce notification clutter and improve focus on critical updates.
Load More
→